Tuesday 27 August 2013

How to Enable Microsoft .NET Framework 3.5 in your windows 8 OS

In this post, I will share 2 different ways to enable Microsoft .NET Framework 3.5 in Windows 8. The first way using Windows 8 Installation DVD or windows8pro.iso and the second way is using internet connection .
LET'S CHECK IT OUT

How to Enable Microsoft .NET Framework 3.5 Offline


Have you encountered some problem like that when you are going to run some application? If your answer is yes, this tutorial will help you to solve that problem.
Before we start, we need to prepare the file of "windows8pro.iso/nrg (etc)" or DVD that contains the installation of windows 8 pro. if your windows 8 pro is 32 bit or 86x I will give you the application that will help you enable it easier. click this link if you are using windows 8 32 bit x86
If you are using Windows 8 pro 64 bit read this tutorial.
  1. Mount your windows8pro.iso image or insert your windows 8 pro 64 bit DVD
  2. Open your command prompt don't forget to run as administrator and type this:
  3. Dism /online /enable-feature /featurename:NetFx3 /All /Source:F:\sources\sxs /LimitAccess
    In the command prompt, after you copied the press left button on your keyboard. Change the destination of the source according to the correct location of your installation image, in this example is " ... All/source:F: ....." change the F if your drive latter installation is not in F. It could be at drive D: E: F: G: H: etc depend which drive your installation file is. when you sure the drive latter is correct press enter
  4. Wait for a few minutes until the process is complete
  5. If the process is already done this command prompt will be appear like the picture above, type Exit or close the window and your NET Framework 3.5 is ready to use

How to Enable Microsoft .NET Framework 3.5 Online

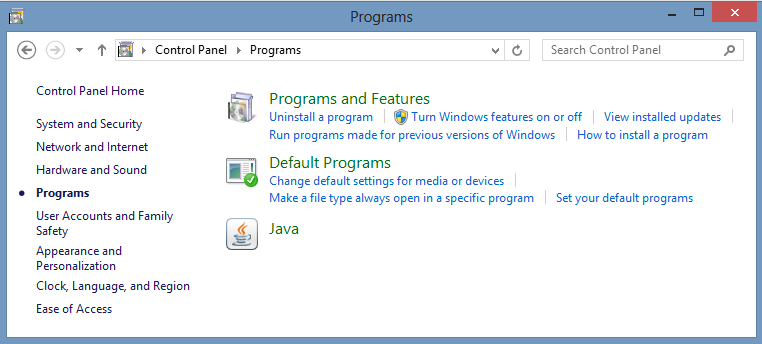
Make sure your internet connection is quite fast and stable. without request time out. It is necessary to make the process successfully. Follow the instruction below :
  1. Open Control Panel and click "Programs"
  2. In the Programs menu left click "Turn Windows features on or off."
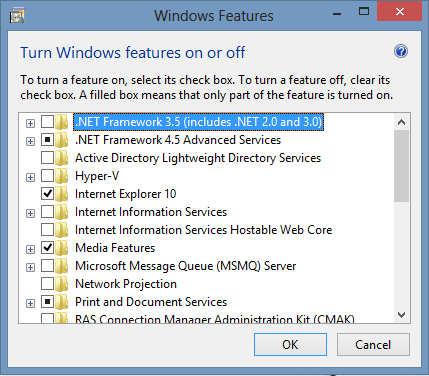
  3. Click the empty box in the left side of " .NET FRAMEWORK 3.5 (Includes 2.0 and 3.0) "
  4. Follow the instruction and wait until the process completed. Check again windows features to make sure the Framework is already installed. If it appears like the picture below, your Framework 3.5 is ready to use.
I hope this tutorial can help you and if you have some question just ask me or sent me an email to syawalhastaf@gmaill.com

Thursday 13 June 2013

How to Make Bootable Flashdisk or Hardisk with Command Prompt

Why we need bootable Flash disk or Hard disk? It is really useful when you want to install lot of PC or Notebook efficiently. Some notebook event doesn’t have CD or DVD room, using external DVD portable would make you spend lot of money to buy it. Flash disk is cheaper than external DVD portable. If you use DVD it would scratch the disc and would not have long lifetime.

This method could be used to install windows Operating System such as windows XP, Windows 7, and Windows 8 with Hard Disk or Flash disk. In this tutorial I would like to make bootable Flashdisk that contain Windows 8 pro installer.

  1. Prepare at least 4 GB free storage device because windows 8 pro itself spend at least 3, 82 GB. (If you use Flash disk I recommend to use 8 GB flash disk or more. With this method you can still use the Flash disk with any other files as usual).
  2. Insert Flash disk to your USB port at your PC or Notebook. That has windows operating system in it. Back up your data in your Flash Disk if you have important data, I recommend to make your Flash Disk empty first. Because it will be formatted with this method.
  3. Open Command Prompt. It is easier by pressing windows logo button and press button R at the same time on your keyboard.
    (Windows + R).
  4. In the Command Prompt window, type “DISKPART” and then press “ENTER”. Don’t worry in command prompt it is not case sensitive it’s up to you to use lower case or upper case.
    After you press “ENTER”, this window will appear.
  5. Type “LIST DISK” and then Press “ENTER”. Remember to type “LIST DISK” with space between List and Disk.
    This window will appear, look at the each of disk sizes to identify the type of the storage devices. For the example the size of Disk 0 is 465 GB that is my hard disk size in my notebook. Disk 1 size is 7680 MB, so this is the size of Flash Disk that I want use as bootable Flash disk.
  6. Type this command in order and press enter every line.
    • SELECT DISK 1
    • CLEAN
    • CREATE PARTITION PRIMARY
    • SELECT PARTITION 1
    • ACTIVE
    • FORMAT FS=NTFS
    Wait until 100 % Completed and then type “EXIT” and then press “Enter”. You can also skip the “FORMAT FS=NTFS” with faster format method.

    Click the flashdisk and this is the massage box will appear, choose format disk.
    After you choose format disk, this window will appear, change the file system into "NTFS" and click start to format the flashdisk.
    wait until format is completed.
  7. Insert the Windows 8 installer, it could be DVD of Windows 8 or if you have the windows8.iso (image or NRG) files you can mount it now. I recommend to use daemon tools to mount the image of the disc. Click this link to know how to make iso or nrg files.
  8. Run Command Prompt as Administrator. Type the directory of the disk that contain windows 8. For the example if directory is F, type " F: " and then press enter. Type CD BOOT press enter, Type again BOOTSECT.EXE/NT60:
    Wait until the process complete like the picture of CMD window below this text.
  9. copy all the file inside the disc windows 8 into the flashdisk
  10. Now you can use it as the Installer of windows 8 operating system. just manage the boot priority or choose the boot option in BIOS ( by presing F2 or F12, etc depend on the type of your device in the very early start of your devices. if you are already using windows 8, you have to turn off the turn on fast first, to make you be able to manage the BIOS of your devices). thank you very much for reading this tips.

How to Install and use Daemon Tools


Daemon Tools is a really good application which can make your PC/Notebook have a virtual DVD Devices. It's work really efficient and faster for doing some installation proses that need DVD. Using DVD will spend lot of time because, it spent lot of time when reading, processing and copying the data. DVD will not have a long lifetime and it the data inside the DVD will be corrupted faster by the time goes on.

Creating an image(extension such nrg, iso and etc) is a solution to back up your DVD file. Some websites and companies have shared their Operating System product with Image Iso File. For example windows 8.1 preview, ubuntu, backtrack and many more are sharing their download link to download the Operating system ISO file.

With Daemon Tools we can mount the image easily and faster, without spending much time to extract it with WinRar/Zip. You can download Daemontools Here